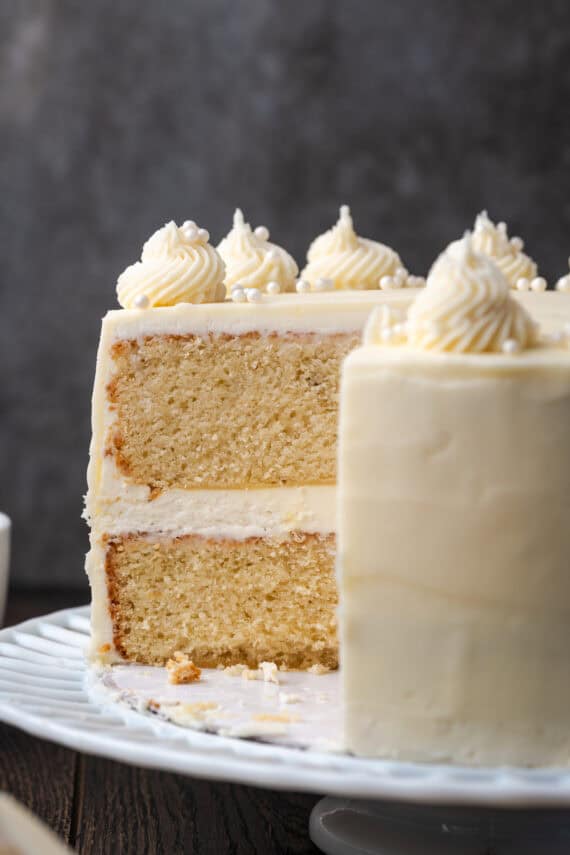
This recipe makes the perfect vanilla cake that’s soft, moist, and buttery. It’s easier than you think, and I’m sharing all my best cake-baking secrets, including how to frost and stack the cake layers!
I think everyone should have a perfect, never-fail, classic cake in their recipe box. Check out my chocolate layer cake for a chocolate version of this easy vanilla cake.
It took me 10 years of blogging before I shared my original vanilla cake recipe. Ever since, I’ve tweaked it and perfected it, bringing us to the best-ever vanilla cake we’re making today. It actually started as vanilla cupcakes. Look how far we’ve come! This recipe makes a soft, moist, tender vanilla layer cake that you can frost and decorate to your heart’s content. It takes under an hour, and you’ll never need another recipe!
Note that this cake recipe was originally posted in 2019. I have updated the photos and the tips in 2025. The recipe remains the same!
What Makes This the Best Vanilla Cake Recipe
The best texture. My vanilla cake has that moist and fluffy, coveted texture of a boxed cake, only the flavor of this homemade cake is a million times better! It’s truly something special.
Rich vanilla flavor.Buttermilk and real butter are the secret to a super tender, flavorful crumb. This cake is sweet, but not TOO sweet, which was definitely one of the goals when I set out to create this recipe. There’s plenty of vanilla richness in every bite.
Adaptable. Everyone needs a perfect cake recipe in their life. The beauty of a vanilla cake is that it’s perfect for any occasion. Top the cake with the classic buttercream that I share below, or top it with party frosting and you have a classic birthday cake. Or, cover the frosted cake with fondant for something more fancy.
Easy. Above all, this vanilla cake doesn’t require any fancy equipment or pro skills to make! It’s a quick, approachable cake that anyone of any skill level can make in one bowl in a little over 30 minutes.
Ingredients You’ll Need
My first nugget of wisdom when it comes to baking perfect cakes, is to use the highest quality ingredients you can. The right ingredients make the difference between a good cake and the BEST vanilla cake, which is what we’re after here.
I’ve included some ingredient notes below to get you off on the right foot. Scroll down to the recipe card for a printable list with the full recipe amounts.
Butter – The real stuff, not margarine! I use salted butter in this recipe (as I do in most of my baking) which is completely my personal preference. If you have a salt sensitivity, feel free to use unsalted butter.
Sugar – For a consistent light texture, I recommend granulated sugar.
Vegetable Oil – A little oil goes a long way to an ultra-moist, tender cake crumb. Choose a neutral-flavored oil, like canola.
Eggs – Bring these to room temperature.
Vanilla Extract – Like the butter, you’ll want to use the real thing and not imitation. Pure vanilla extract, or an equal amount of vanilla paste, is a must for the absolute best flavor in this vanilla cake.
Baking Powder – Not to be confused with baking soda. Check the expiration date on your baking powder to make sure it isn’t past its prime.
Cake Flour – Cake flour is different from all-purpose flour, and it’s the key to a super-soft, velvety cake crumb like you get from a box of cake mix (see below for details).
Buttermilk – Another non-negotiable! The acidity in buttermilk combined with the baking powder produces a more tender crumb by breaking down the gluten. If you don’t have buttermilk, make a homemade substitute from regular milk and white vinegar (or lemon juice). You could swap in plain yogurt as a last resort, but buttermilk offers a much better flavor.
Cake Flour vs. All-Purpose Flour
Cake flour has a lower protein content than all-purpose flour. Less protein = less gluten, and a lighter, airier cake as a result. I used to think these two types of flour were interchangeable in recipes, but after baking hundreds of cakes, I’ve since seen the light.
Cake flour is an important ingredient in cake recipes where we’re after a super light crumb (think, angel food cake). This vanilla cake just isn’t the same without it. If you’re in a bind, I even have a tutorial on how to turn all-purpose flour into cake flour.
How to Make a Perfect Vanilla Cake
If you’re new to baking cakes, you’re in the right place. Follow the steps here to make up the cake batter in one bowl, in the time it takes to preheat the oven. You’ll find the printable instructions in the recipe card.
Prep the pans. While the oven preheats to 350ºF, grease and line the bottom of two 8” or 9” round pans with parchment paper.
Combine the wet ingredients.Add the flour and buttermilk.
Mix the wet ingredients. Start by creaming the butter and sugar together until it’s light and fluffy. Then, add the oil, eggs, vanilla, baking powder, and a pinch of salt. Continue to mix until smooth.
Add the flour and buttermilk. Next, alternate adding flour and buttermilk to the wet ingredients, beginning and ending with the flour. Mix until the flour is just combined with the wet batter.
Mix the cake batter.Fill the pans and bake!
Fill the pans and bake. Divide the vanilla cake batter evenly between your two prepared pans. Bake at 350ºF for 30-35 minutes, until the cakes are set in the center.
Cool completely. Afterward, leave the cakes to cool in the pans for 10 minutes. Then, remove them and place them on a wire rack to finish cooling to room temperature before you frost them.
Assemble and Frost the Cake
For this vanilla cake recipe, I use my favorite buttercream frosting. There are plenty of ways to finish and frost a cake, and I’m a firm believer that it doesn’t have to look good to taste good. With that being said, there are a few easy steps you can take to assemble a perfect vanilla layer cake:
Level the cake layers. When cakes bake, they often form domes as they rise. This is a good visual indicator that your cake will be light and airy on the inside (yay!). But, since level layers are easiest to stack and frost, it’s best to trim the domes once the cakes have cooled. You don’t need a fancy cake leveler to do this, just a serrated knife. Carefully trim off the rounded top of each cake, so they’ll stack evenly.
Add a crumb coat. After you’ve stacked and filled your cake layers with frosting, it’s a good idea to make a crumb coat if you plan on frosting the rest of the cake. A crumb coat is simply a thin, rough layer of frosting applied to the outside of a layer cake before you add the final layer of frosting over top. It catches any stray crumbs, for a perfect finish.
I frost in between the two cake layers to create an easy, two-layer cake. You can also slice each layer in half to make a fabulous 4 layer cake! If you choose to do this, increase the frosting amount by at least 50% so you have enough.
Recipe Tips
Don’t I need to sift the flour? I love baking, but I make a point to try to cut down on steps that I feel are unnecessary. Like sifting the dry ingredients! Instead, I cream the baking powder in with the wet ingredients and add the flour on its own. Sift if you’d like, but even without it, this cake turns out perfect.
Grease, line the pan, and grease again. This vanilla cake has a high sugar content and will easily stick to a pan that’s not properly prepped. I like to spray the cake pans with cooking spray, place a circle of parchment paper into the bottom, and spray again. The parchment paper acts as insurance against sticking and makes the cakes quick and easy to remove after baking.
Don’t overmix. Overmixing the batter is the #1 “avoid at all costs” mistake when it comes to homemade cakes. Once you’ve added the flour and buttermilk, mix just until the batter is creamy and combined (this should take less than 30 seconds). Too much mixing overworks the gluten and deflates the air pockets, resulting in a dense, flat cake that won’t rise properly.
Scrape down the sides of the bowl. To ensure even mixing, remember to scrape down the sides of the bowl with a spatula as the batter comes together.
Test the cakes for doneness. Your vanilla cakes are done baking when a toothpick stuck into the center of the cake comes out clean. A few moist crumbs are fine, but you shouldn’t see any streaks of batter.
How to Decorate Your Vanilla Cake
Now, for the real fun part: Decorating! This vanilla cake is the ultimate blank canvas for frosting and decorating, so feel free to get as creative as you’d like. Here are some quick cake decorating tips and ideas:
Use a cake scraper. After spreading the frosting over the layers with an offset spatula, use a cake or icing scraper to smooth out the top and edges. This will give you a perfectly smooth finish like you see in the photos.
Pipe frosting swirls. If you have a piping bag and piping tips, use an open star or French star tip to create fun little frosting rosettes and swirls on top of the cake.
Garnishes. Top this vanilla cake with sprinkles, nonpareils, silver balls (dragees), crushed nuts, toasted coconut, fresh fruit, candy, and any decorations your heart desires.
Holidays and occasions. Use this cake as a base for a Halloween spider cake, turn it into a cannoli cake, or make a festive Christmas snowman cake.
Make-Ahead and Storage
Make-ahead. Wrap the cooled, unfrosted cakes tightly in cling wrap and store them at room temperature for up to 2 days. You can also double-wrap the cakes and freeze them for up to a month. Thaw the cakes at room temperature before frosting.
Store the finished cake. Keep the frosted vanilla cake covered airtight at room temperature for up to 3 days. You can refrigerate it if you live somewhere warm, but I recommend serving the cake at room temperature.
Freeze. Freeze the frosted cake whole or in slices, double-wrapped in cling wrap, or stored in an airtight container. Thaw unwrapped at room temperature.
This recipe makes the perfect vanilla cake with two light, fluffy cake layers filled and frosted with buttercream. Made 100% from scratch, with tips and tricks to make it buttery, soft, and moist!
1 cup salted butter, room temperature
2 cups granulated sugar
1/4 cup vegetable oil
4 eggs
1 tablespoon vanilla extract
2 teaspoons baking powder
1 teaspoon kosher salt
3 cups cake flour
1 cup buttermilk
Preheat oven to 350°F. Coat 2, 8 or 9- inch round cake pans with nonstick spray. Cut two pieces of parchment paper into 9- inch circles. Place the rounds in the bottoms of the pans. Coat again with nonstick spray. Set aside.
In the bowl of your stand mixer, fitted with paddle attachment mix the butter and sugar together for 2 minutes. Add in the oil, eggs, vanilla, baking powder, and salt, and continue mixing for an additional minute until smooth and combined, scraping the sides of the bowl as necessary to make sure everything is evenly mixed.
Turn the mixer to low speed and in alternating portions add in the buttermilk and flour, beginning and ending with flour. Mix for 30 seconds, until combined and smooth, again, scraping the sides of the bowl as needed.
Pour half of the cake batter into each prepared pan.
Bake for 30 – 35 minutes, or until the center of the cakes are set, and a toothpick inserted in the middle comes out clean.
Allow the cakes to cool in the pans for 10 minutes, and then remove the cakes and allow to cool completely on a wire rack.
Notes
If you’re making ahead, wrap the cakes tightly in cling wrap and store at room temperature for up to 2 days. Alternately you can wrap the cakes in cling wrap, then place them each in a large zip-top bag and freeze for up to a month.